www.NewsDownload.co.uk Page 23

Raspberry Pi Media Center Handheld Portable and Battery Powered

2013-06-27 06:33 By Jason Birch

A media center which can be used on the go, using AA batteries via it's LCD display and internal audio amplifier. Or can be used at home with a large HDMI or composite video display. It can play video or audio from a play-list, it can also play internet radio stations.

VIDEO
The video here demonstrates the project which this article describes how to build.

The article breaks the project down into several stages:

  • Build
  • Operating System
  • System Application Software
  • Configuration
  • Operation
  • Project Costing

Reference:

Build
This project is based on the Headless Pi project, full details can be found clicking here. And also the 1W Audio Amplifier project, full details can be found clicking here. The display is from the Handheld Mame project, this is re-documented here as the audio amplifier circuit in the display unit has now been revised and is far superior to the previous project.

Once the Headless Pi project is built, from a hardware point of view, the only thing which needs to be built is the display unit. This unit connects directly into the Raspberry Pi audio and composite video connectors. In addition there is a power connector which is supplied directly from the battery pack to provide ~7.2V to the display and audio amplifier.


Build the 1W Audio Amplifier project and this fits under the display module, the capacitors on the amplifier may have to be placed on the strip-board laying down in order for the circuit to fit comfortably under the display PCB.

A miniature speaker was used, which was taken from a broken Android tablet computer, any 8 ohm miniature speaker can be used. There is enough space to place one pointing out of the back of the case. The one used here was small enough to point out of the side of the case, which is much better.

The display is taken from a car reversing monitor purchased on eBay. It can be connected directly to the Raspberry Pi composite video output. They are designed for 12V, but both of the ones I have purchased run OK on 7.2V too.

Operating System
I use Arch Linux in my projects because it boots much faster than Raspbian. Raspbian should work with this project too, however this write-up is tested with Arch Linux and there will be some slight differences with the way the each of the operating systems are configured.

Install the latest Arch Linux onto an SD card, refer to www.raspberrypi.org/downloads for details of how to do this.

Boot the Raspberry Pi with the SD card and perform the following commands to make sure the operating system is up to date:
pacman -Syu
reboot

Install the omxplayer command line application, if you have issues with this version of the omxplayer, refer to the 1W Audio Amplifier project for details on how to use the one which comes with Raspbian:
pacman -S omxplayer-git


System Application Software
Download
V1.00 2013-06-11 - Media Player application.

Download the application package here.

The application for the project consists of the following files:

README.txt          - Information about the package.
License.txt         - User license agreement.
License.dat         - License file.
MediaPlayer         - Linux application.
MediaPlayer.ini     - Application configuration file.
MediaPlayer.service - OS service configuration.
ArchInstall.sh      - Script to install on Arch Linux.
RestartNetwork.sh   - Script to start network.
PlayList.DAT        - Session and play-list data.
RADIO.DAT           - Internet radio station list.

Place the application package into the /root/ directory. Then run the following commands at the terminal as root:
cd /root/
gunzip MediaPlayerDistribution.tar.gz
tar -xf MediaPlayerDistribution.tar
cd /root/MediaPlayer/
chmod +x ArchInstall.sh
./ArchInstall.sh


Configuration
The configuration files can be found in the /root/MediaPlayer/ directory and can be edited with a text editor such as nano.
e.g. To edit the file MediaPlayer.ini, from the command line type:
nano /root/MediaPlayer/MediaPlayer.ini

Then press ^O to save changes, where ^ means hold down the CTRL key while pressing the O key. And press ^X to exit the nano text editor.

MediaPlayer.ini
MP4_PATH=      - The path where a tree of directories
                 containing video files is located.
MP3_PATH=      - The path where a tree of directories
                 containing audio files is located.
RADIO_FILE=    - The file where the internet radio
                 stations are listed.
MP3_SPEC=      - File extensions to identify
                 audio files.
MP4_SPEC=      - File extensions to identify
                 video files.
OMXPLAYER=     - Location of the omxplayer
                 application.
OMXPLAYER_VOL= - Does the omxplayer support the vol
                 command-line argument.
OMX_LOG_NAME=  - The name of the log file generated
                 by the omxplayer application. Used
                 when omxplayer application does
                 not support the vol command-line
                 argument.
EXIT_SHUTDOWN= - Shutdown or just exit application.
SYS_TEMP=      - CPU temperature for red LED.

All other entries in the file are from the Headless Pi project, refer to the HeadlessPi.ini file in the Headless Pi write up.

RADIO.DAT
This file is pre-populated with a list of radio stations. Removing a line will remove it from the list displayed in the application. When adding a radio station add one of a format which is compatible with the omxplayer application. All of the ones currently in the file are of the format MP3. The lines are formatted a little bit odd, in order to make it easier for the application to read. Each line must start with a space character and end with a full-stop character. Between the space and full-stop is the URL of the internet radio station, a '|' character and then the name of the station to be displayed in the application. e.g.:
 http://listen.onmyradio.net:8002/|Jazz FM.

RestartNetwork.sh
This is a script to connect to the Wifi network when the NET option is selected in the application. The file will need to be edited to set the Wifi SID and encryption key, it may even need to be significantly different depending on the type of encryption configured on the Wifi router.

PlayList.DAT
Do not edit this file, the file contains data saved when the application shuts-down, to be reloaded when the application next starts. The data is things like last used volume level, last selected radio station, ... Editing this file may prevent the application from starting, if this happens, delete the file and the application will recreate the file when it next shuts-down.

NOTE: Video Codecs
Most video files can be played without issue or cost. But there are two types of video files which require the purchase of a license key for the codec before they will play. If you have a video file which will not play, check if the file is one of these formats. Click this link for more details.


Operation
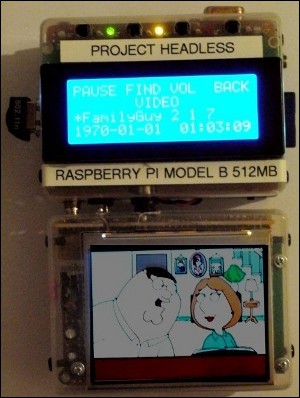
After the application has been installed, when the device is switched on, after a few seconds the LCD display should light up and display the application splash screen. This will display for a couple of seconds and then change to the home menu.

The first display line shows the current menu options.
The second display line shows the current menu name.
The third display line displays the current selected or playing item. If the item is too long it will automatically scroll to display the full item text. The first character of the item has a special meaning. '*' means the displayed item is currently playing. '.' means the displayed item is in the play-list. '>' means the displayed item is a directory.
The fourth line displays the current date and time.

There are four LEDs. The first blue LED indicates a connection to the last selected internet radio station is possible. The green LED shows that media is currently playing. The yellow LED shows the currently playing media is paused. The red LED indicates the CPU temperature is high. The second blue LED flashes to the show the system is currently operational.

Home
From the Home menu select the type of media to play, Audio, Video or Radio. The X option is to shutdown the device, connect to the Wifi network or configure the LCD sleep mode.

Video
In the Video menu, the Pause option will Pause or Resume any playing video, audio or radio station.

The Find option will display the contents of the initial video directory. Sub directories will also be displayed, so videos can be stored in logical hierarchies of directories. Only videos with extensions specified in the configuration file will be displayed. While navigating there is a left and right scroll option. A Sel option to move into a sub directory or start playing a video file. And a Back option to move back to the previous directory or back to the Video menu.

The Vol option will display the Volume menu, see below for a description of this menu.

The Back option will move back to the Home menu

Audio
In the Audio menu, the List option will display the current audio play-list. While navigating there is a left and right scroll option. A Del option to delete the currently selected item from the play-list. And a Back option to move back to the Audio menu.

The Find option will display the contents of the initial audio directory. Sub directories will also be displayed, so music can be stored in logical hierarchies of directories. Only music with extensions specified in the configuration file will be displayed. While navigating there is a left and right scroll option. A Sel option to move into a sub directory or toggle the current item into the play-list, a '.' as the first character shows the item is in the play-list. And a Back option to move back to the previous directory or back to the Audio menu.

The Vol option will display the Volume menu, see below for a description of this menu.

The Back option will move back to the Home menu

Radio
To listen to an internet radio station, a connection to the internet must be established. If the Ethernet cable is plugged in the connection should automatically be established. To use a Wifi connection, see information about the X menu below.

The Stop option will stop any playing video, audio or radio station.

The Find option will display the list of radio stations, the last one selected will automatically be selected again. While navigating there is a left and right scroll option. A Sel option to start listening to the selected internet radio station. And a Back option to move back to the Radio menu.

The Back option will move back to the Home menu

Volume
In the Volume menu, -VOL decreases the volume, +VOL increases the volume.

The Stop option will stop any playing video, audio or radio station. If no media is currently playing, this option will show as Play and will start playing the Audio play-list at the next play-list item.

The Back option will move back to the Home menu

X
In the X menu, the NET option will run the script to connect to the Wifi network.

The Sleep/Awake option will set the LCD display to be switched off after 60 seconds of inactivity or to remain on permanently.

Selecting the Yes option will shutdown the system, or selecting the No option will return to the Home menu.

Project Cost
Item Reference Qty Each Cost
Headless Pi Project NewsDownload.co.uk 1 £36.68 £36.68
1W Audio Amplifier Project NewsDownload.co.uk 1 £8.00 £8.00
Stereo 3.5mm Jack Plug BitsBox 1 £0.63 £0.63
Phono Plug BitsBox 1 £0.22 £0.22
2.5mm Power Plug BitsBox 1 £0.39 £0.39
2.5mm Panel-mount Power Socket BitsBox 1 £0.76 £0.76
Stripboard 127 x 95mm 50 holes x 36 holes BitsBox 1 £1.59 £1.59
Playing Card Case eBay 1 £0.99 £0.99
3.5" Car Reversing LCD Display eBay 1 £15.00 £15.00
Plastic Snap Rivets 10 Pack Maplin 1 £1.49 £1.49
SUB TOTAL £65.75
Raspberry Pi Model B Farnell (element 14) 1 £34.02 £34.02
4GB SD Card eBay 1 £3.99 £3.99
TOTAL £103.76

Loading...